Saturday, December 22, 2012

The Power of Concentration (NYTimes)


MEDITATION and mindfulness: the words conjure images of yoga retreats and Buddhist monks. But perhaps they should evoke a very different picture: a man in a deerstalker, puffing away at a curved pipe, Mr. Sherlock Holmes himself. The world’s greatest fictional detective is someone who knows the value of concentration, of “throwing his brain out of action,” as Dr. Watson puts it. He is the quintessential unitasker in a multitasking world.
Time Life Pictures/Mansell via Getty Images
A drawing of Sherlock Holmes by Sidney Paget from 1891 in The Strand Magazine.
More often than not, when a new case is presented, Holmes does nothing more than sit back in his leather chair, close his eyes and put together his long-fingered hands in an attitude that begs silence. He may be the most inactive active detective out there. His approach to thought captures the very thing that cognitive psychologists mean when they say mindfulness.
Though the concept originates in ancient Buddhist, Hindu and Chinese traditions, when it comes to experimental psychology, mindfulness is less about spirituality and more about concentration: the ability to quiet your mind, focus your attention on the present, and dismiss any distractions that come your way. The formulation dates from the work of the psychologist Ellen Langer, who demonstrated in the 1970s that mindful thought could lead to improvements on measures of cognitive function and even vital functions in older adults.
Now we’re learning that the benefits may reach further still, and be more attainable, than Professor Langer could have then imagined. Even in small doses, mindfulness can effect impressive changes in how we feel and think — and it does so at a basic neural level.
In 2011, researchers from the University of Wisconsin demonstrated that daily meditation-like thought could shift frontal brain activity toward a pattern that is associated with what cognitive scientists call positive, approach-oriented emotional states — states that make us more likely to engage the world rather than to withdraw from it.
Participants were instructed to relax with their eyes closed, focus on their breathing, and acknowledge and release any random thoughts that might arise. Then they had the option of receiving nine 30-minute meditation training sessions over the next five weeks. When they were tested a second time, their neural activation patterns had undergone a striking leftward shift in frontal asymmetry — even when their practice and training averaged only 5 to 16 minutes a day.
As little as five minutes a day of intense Holmes-like inactivity, and a happier outlook is yours for the taking — though this particular benefit seems to have been lost on Holmes himself, what with his bouts of melancholy and his flirtations with a certain 7 percent solution. A quick survey will show that the paradox is illusory: Holmes is depressed when there is no target for his mental faculties. Give him a project, and balance is restored.
But mindfulness goes beyond improving emotion regulation. An exercise in mindfulness can also help with that plague of modern existence: multitasking. Of course, we would like to believe that our attention is infinite, but it isn’t. Multitasking is a persistent myth. What we really do is shift our attention rapidly from task to task. Two bad things happen as a result. We don’t devote as much attention to any one thing, and we sacrifice the quality of our attention. When we are mindful, some of that attentional flightiness disappears as if of its own accord.
In 2012, researchers led by a team from the University of Washington examined the effects of meditation training on multitasking in a real-world setting. They asked a group of human resources professionals to engage in the type of simultaneous planning they did habitually. Each participant was placed in a one-person office, with a laptop and a phone, and asked to complete several typical tasks: schedule meetings for multiple attendees, locate free conference rooms, write a memo that proposed a creative agenda item and the like. The information necessary to complete those tasks? Delivered as it otherwise would be: by e-mail, through instant messages, over the phone and in person. The list was supposed to be completed in 20 minutes or less.
After the multitasking free-for-all, participants were divided into three groups: one was assigned to an eight-week meditation course (two hours of instruction, weekly); another group didn’t take the course at first, but took it later; and the last group took an eight-week course in body relaxation. Everyone was put through a second round of frenzy.
The only participants to show improvement were those who had received the mindfulness training. Not only did they report fewer negative emotions at the end of the assignment, but their ability to concentrate improved significantly. They could stay on task longer and they switched between tasks less frequently. While the overall time they devoted to the assignment didn’t differ much from that of other groups, they spent it more efficiently. They engaged, on average, in just over 40 discreet “tasks” — test-related behaviors that had a definable start and end time — spending approximately 36 seconds on each, in contrast to the 48 to 50 average tasks attempted by the other groups — with an average of only 30 seconds spent per activity. They also remembered what they did better than the other participants in the study.
The concentration benefits of mindfulness training aren’t just behavioral; they’re physical. In recent years, mindfulness has been shown to improve connectivity inside our brain’s attentional networks, as well as between attentional and medial frontal regions — changes that save us from distraction. Mindfulness, in other words, helps our attention networks communicate better and with fewer interruptions than they otherwise would.
In a 2012 study at Emory University, increased meditation practice was associated with enhanced connectivity between the dorsolateral prefrontal cortex, a part of the brain involved in attention monitoring and working memory, and the right insula, an area that is associated with how well we can monitor our own feelings and thoughts and that is considered a key waypoint between our two major attention networks, the default and the executive.
Not only could this increased connectivity make us better able to switch between tasks and monitor our own attention, but it is indicative of more effective overall management of our finite attentional resources.
Mindfulness training has even been shown to affect the brain’s default network — the network of connections that remains active when we are in a so-called resting state — with regular meditators exhibiting increased resting-state functional connectivity and increased connectivity generally. After a dose of mindfulness, the default network has greater consistent access to information about our internal states and an enhanced ability to monitor the surrounding environment.
These effects make sense: the core of mindfulness is the ability to pay attention. That’s exactly what Holmes does when he taps together the tips of his fingers, or exhales a fine cloud of smoke. He is centering his attention on a single element. And somehow, despite the seeming pause in activity, he emerges, time and time again, far ahead of his energetic colleagues. In the time it takes old detective Mac to traipse around all those country towns in search of a missing bicyclist in “The Valley of Fear,” Holmes solves the entire crime without leaving the room where the murder occurred. That’s the thing about mindfulness. It seems to slow you down, but it actually gives you the resources you need to speed up your thinking.
The difference between a Holmes and a Watson is, essentially, one of practice. Attention is finite, it’s true — but it is also trainable. Through modifying our practices of thought toward a more Holmes-like concentration, we can build up neural real estate that is better able to deal with the variegated demands of the endlessly multitasking, infinitely connected modern world. And even if we’ve never attempted mindfulness in the past, we might be surprised at how quickly the benefits become noticeable.
Until recently, our 20s were considered the point when our brain’s wiring was basically complete. But new evidence suggests that not only can we learn into old age, but the structure of our brains can continue to change and develop. In 2006, a team of psychologists demonstrated that the neural activation patterns of older adults (specifically, activation in the prefrontal cortex), began to resemble those of much younger subjects after just five one-hour training sessions on a task of attentional control. Their brains became more efficient at coordinating multiple tasks — and the benefit transferred to untrained activities, suggesting that it was symptomatic of general improvement.
Similar changes have been observed in the default network (the brain’s resting-state activity). In 2012, researchers from Ohio State University demonstrated that older adults who scored higher on mindfulness scales had increased connectivity in their default networks, specifically in two of the brain’s major information processing hubs. And while we already know that this kind of increased connectivity is a very good thing, there’s more to these particular results. The precise areas that show increased connectivity with mindfulness are also known to be pathophysiological sites of Alzheimer’s disease.
The implications are tantalizing. Mindfulness may have a prophylactic effect: it can strengthen the areas that are most susceptible to cognitive decline. When we learn to unitask, to think more in line with Holmes’s detached approach, we may be doing more than increasing our observational prowess. We may be investing in a sounder mental future — no matter how old we are.
Maria Konnikova is the author of “Mastermind: How to Think Like Sherlock Holmes” and a doctoral candidate in psychology at Columbia.

Tuesday, December 18, 2012

Repost from Loosen Up by Anne Kullaf


The Portability of the Pencil

Recently, I began sketching in pencil after being strictly a charcoal artist for just about my entire career. Why? While I love the ability to block in large areas at a time with charcoal, I don’t love getting really dirty before attending receptions or dropping off paintings at galleries and exhibits. I need to make the most of my time when I am in the city, by combining  exhibit business with sketching days, I get a lot more accomplished.
But getting used to the “pointiness” of the pencil was definitely a challenge–pencil is so linear. I am used to using the side of the charcoal to block in an entire area of dark and middle values, with pencil, I also use the side a lot more than the edge. I am also going to get myself a chisel point (carpenter’s) pencil, which will definitely help in defining those large areas of shadow more efficiently.
I currently am using a set of Staedtler Mars drawing pencils–a range of hard and soft, but I have to admit I primarily use the soft ones because I like to get my darks established from the beginning. I do use the full range when I am working on larger drawings, but if I just have my little Moleskine sketchbook (pictured above), then I can usually get away with 3 pencils (an HB, 4B and 7B) to create a sketch with a good range of values.
Sketching on site, regardless of the medium you use, is such a valuable exercise. Even if you are primarily a studio painter, you observe so much more on location rather than relying completely on reference photos. So grab a pencil and get out there, it’s fun and will really improve your observation skills!

Monday, December 3, 2012

Freshman Homework

Foreshortened Self Portrait:

Subject:
 Begin your drawing by toning your paper to a 4 or 5 on a value scale (medium gray).  Always start with your vine charcoal to allow easy erasures and begin by looking at the Gestalt (the whole form) and envelope the outer perimeter of the largest forms in your drawing, then move onto organization lines which will set your height and width measurements.  Once you have correctly and accurately recorded the height and width measurements yo may begin blocking in the rest of the form (and you may begin addressing all of those beloved details ).  Please refer to the previous post for images of this beginning drawing process.

   Observing yourself from a mirror complete a full body self portrait in which a minimum of one of your limbs is employing foreshortening;  that is. begin with the form nearest you, enclose that form, then proceed to the adjacent form, enclosing it.  Be careful to draw what you see, not what you know or imagine the form to be.  For example, in drawing the leg analyze the parts that compose the form: foot, ankle, calf, knee, thigh, hip connection.  This is unlike a profile drawing where you are presented with the side view and each form flows into the next.  Foreshortening describes the forms projection into space.
 
   In foreshortening a feeling of distance is achieved by a succession of enclosed, overlapping forms.  Make careful sightings when making horizontal and vertical measurements.  Note the relationships in height and width between each level of overlap; for example in a reclining pose the height and width of the foot, compared to the shape immediately behind it, the calf; the length and width of the calf compared to the thigh, and so on.


Size: 18x 24

Materials:  Vine charcoal, Compressed charcoal, Kneaded Eraser, Rubber Eraser, Chamois or Paper Towel ( for toning the paper )


Due Date: Wednesday December 12th


Monday, November 19, 2012

The Envelope, Block In and Proportions.

I did some quick researching online to find some more examples of the "Envelope" method we have been using in class.  This is very clearly illustrated in this little write up by Robert T. Barrett. Enjoy!


Exercise I. Drawing the Human Figure: Using a Simple Block-In

Using an envelope block-in and gridding to measure and map the figure isn’t a new process. Though some examples of gridding may seem complicated or complex, this measuring process is, nonetheless, a useful tool in learning how to draw people.
I suggest using a simple form of gridding to plot points and angles when completing a traditional life drawing because it will help you establish the correct position and dimension of proportional relationships.

1. Drawing the Human Figure : Create an “Envelope” Around the Figure

A first step in gridding the subject is placing an “envelope” around the outside edges of the figure (below). It’s helpful to use only straight lines during this process because landmarks will occur at intersections where the angle of each line changes direction in a drawing of the human figure.
how to draw people, step-by-step demonstration, how to draw realistic people

2. Drawing the Human Figure : Plot the Inside Landmarks

After you establish the envelope and create the outside angles and proportions, look for inner landmarks (see below). These are often located at points where two angles intersect or at “hard places” where the skeleton is close to the surface.
how to draw realistic people, drawing the figure, life drawing


3. Drawing the Human Figure: The Finish (see below)

This model for my life drawing class, in Seated Male Figure (Nupastel on paper, 30×22), had great anatomical definition, which made the figure drawing techniques of mapping his figure easier.
figure drawing techniques, how to draw realistic people

Thursday, November 15, 2012

Why Bother With An Underpainting?

I found the following images on Anne Kullaf's Blog Loosen Up. It is an excellent example of underpainting and the development of a painting.
This first image shows an incomplete underpainting that resolves issues of proportion, and begins to address value. This underpainting was done using a tinted ground (gesso and some light red ochre) and burnt umber. The values are beginning to be established by the use of washes to block in medium and light values and an undiluted application will block in the darker values.


Notice in this slide the underpainting is blocking in the rest of the background information. Underpaintings are meant to establish a firm structure for your painting but do not need to be resolved and finished in the same way that a finished painting is finished. Notice how loose and gestural the figures and marks are.


This slide illustrates the initial blocking in of color. Notice that we are working with large simple blocks of color or shape, always work from large simple shapes down to smaller more complex shapes. Resist the urge to jump into details.


More color is being introduced. Notice that the artist is starting to work into smaller shapes and that some areas of the underpainting are showing through. You do not have to always use a neutral color but you can see here why it may be helpful because it is harmonious with the palette being used. Imagine if the preliminary underpainting was completed in a bright red or neon green and imagine the effect that might have.


The artist is continuing to refine the painting and developing a nice range of values by mixing tints tones and shades of color. Edges are being cleaned up and objects are brought to a higher level of clarity.


This is the finalized painting. At this point the artist has provided "eye candy" using fully saturated jewel like colors to add details like the lettering in the sign for the restaurant.


This is a detail of one of the figures in this painting. This is a wonderful example that sometimes less is more. The face of this figure is merely suggested through tonal variation as opposed to being meticulously rendered. As an artist you will have to make decisions about how much information to supply the viewer. This is an extremely useful tool to guide the viewers eye around your work.

Sighting Review


*Poached from MCC Drawing Blog

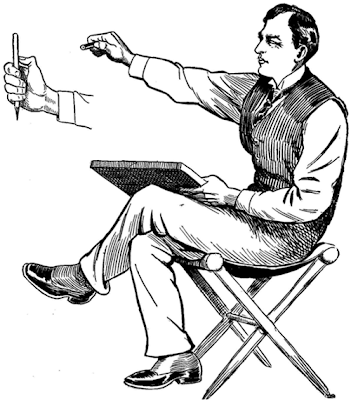
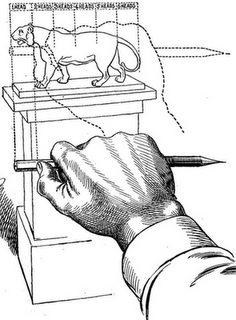
"You can estimate proportions and then check them with a fair degree of accuracy by employing what is called the thumb-and-pencil method of finding proportions. This is done by simply placing your pencil or pen in your hand and then holding it at arms length between your eye and the object that you plan to draw. Here is how:


(1) Hold your body rigid and extend your dominant arm (usually the right arm), pencil in your hand, to its full length.
(2) Place your thumb against the pencil as a gauge (sliding it up and down or to the left or the right, depending on the unit of measurement you wish to establish).

(3)Bring the pencil on a line with your eye and the object that you are measuring.
(4) Try to find one part by which you can then measure the rest of the object. In the diagram above, the head is used as a unit of measurement to determine the length of the subject's body. This is done by aligning the tip of the pencil with the edge of the snout, and the thumb is resting on the pencil to where the head ends at the start of the neck. The tiger above is thus, six heads in length.

(5) Once you find a part to which to measure the rest of the parts of the object, you can then proceed to put in the object’s details, still using the same scale of measurement in which you established.


An example of how to use your pencil as a measuring stick to find the height and width of the house with the use of your pencil and thumb. You can also find the angle of the roof with this method. In drawing the house (as shown above), the height of the chimney might be taken as a standard of measurement. Hold the pencil upright, the top on a line with the chimney top. Now move the thumb downwards until the end of your thumb comes between your eye and the bottom of the chimney. Then draw the chimney. Repeat this measuring operation, finding where the length of the chimney corresponds to other parts of the house. Your pencil can be moved between the house and your eye and by using the chimney length as your standard of measurement, the corresponding length and width of the house can be estimated.

With the pencil and thumb measuring technique, you can even find the angle of an object, such as the house’s roof. Just hold your pencil parallel with the object (in this case the roof). Then, without changing the position or angle of your pencil, just bring it down to your paper and make a light stroke indicating the angle.


Likewise, by sliding the pencil up or down so as to increase or decrease its length between the points ‘a’ and ‘b’, (shown above) you will be able to check the height of an object as shown below. The same principle applies for heights and lengths/widths.


Above is a demonstration of the height of a cone being checked, while the bottom demonstrates the width of the cone being checked.

This thumb-and-pencil method of checking is easy to understand once you experiment with it. Be sure, however, that you do not change your position or distance from the model once you have started to check, since distance and position change the appearance and size of any object under study."

Wednesday, November 7, 2012

Deadline Revision for Advanced Class

6th & 8th Period Students,
  Due to the Hurricane, election, fire drills and other exciting events of late I am extending the deadline for your final Still Life drawings.  Originally these drawings were set to be turned in tomorrow November 8th, I will now accept these for full credit between Thursday November 8th and Friday November 16th.  Please make sure to adequately prepare enough time to FULLY develop your image ( remember a fully developed drawing may take upwards of forty hours to truly develop values, textures and refine forms ). 

*ALL STUDENTS- Please note that all work that you are missing needs to be turned in by  Friday November 16th if you wish to have it considered for your first marking period grade.  Please remember to check your StudentNet account for the most up to date grades.  Have a fantastic day!