Friday, October 28, 2011

Foundation HW (9th Grade)

DUE FRIDAY NOVEMBER 4TH


Complete the following in your sketchbook:

1. A grouping of three books, one opened. Pay close attention to the angles created by the edges of the books.

2. An arrangement of a cup and a saucer, and a sugar bowl. If you do not have these a cup, small plate and a small bowl will suffice. Remember to have objects overlap, not kissing one another or the edge of your paper

*NOTE:
- All objects must have obvious highlight and shadow. Please include cast shadows when they are present.
-All images must fill page.
- When showing more than one object in a composition, the objects must overlap.
- If your sketchbook is smaller than 8.5" x 11" complete each drawing as a two page spread to allow you enough room to develop your drawing.
- Give yourself adequate time to work on your drawings... doing them the night before will most likely result in a rushed, incomplete or under developed drawing and a poor grade.

Intermediate HW (10th Grade)


DUE FRIDAY NOVEMBER 4TH:

Complete the following in your sketchbook:

1. A group of two chairs, a table, and a lamp. Make sure you check your angles and proportions to achieve convincing perspective and a believable space. You may also refer to your composition notes for tips to achieve depth.

2. A dishrack with two dishes and a cup or glass. Pay close attention to the reflected light and the values seen through the glass.

*NOTE:
- All objects must have obvious highlight and shadow. Please include cast shadows when they are present.
-All images must fill page.
- When showing more than one object in a composition, the objects must overlap.
- If your sketchbook is smaller than 8.5" x 11" complete each drawing as a two page spread to allow you enough room to develop your drawing.

Thursday, October 27, 2011

Sighting Review


*Poached from MCC Drawing Blog

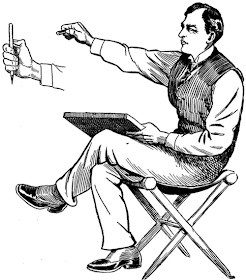
"You can estimate proportions and then check them with a fair degree of accuracy by employing what is called the thumb-and-pencil method of finding proportions. This is done by simply placing your pencil or pen in your hand and then holding it at arms length between your eye and the object that you plan to draw. Here is how:


(1) Hold your body rigid and extend your dominant arm (usually the right arm), pencil in your hand, to its full length.
(2) Place your thumb against the pencil as a gauge (sliding it up and down or to the left or the right, depending on the unit of measurement you wish to establish).

(3)Bring the pencil on a line with your eye and the object that you are measuring.
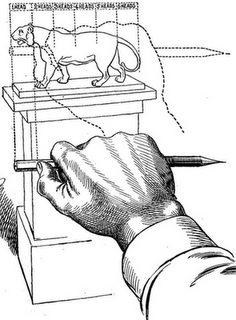
(4) Try to find one part by which you can then measure the rest of the object. In the diagram above, the head is used as a unit of measurement to determine the length of the subject's body. This is done by aligning the tip of the pencil with the edge of the snout, and the thumb is resting on the pencil to where the head ends at the start of the neck. The tiger above is thus, six heads in length.

(5) Once you find a part to which to measure the rest of the parts of the object, you can then proceed to put in the object’s details, still using the same scale of measurement in which you established.
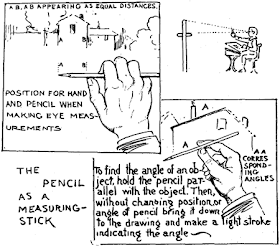


An example of how to use your pencil as a measuring stick to find the height and width of the house with the use of your pencil and thumb. You can also find the angle of the roof with this method. In drawing the house (as shown above), the height of the chimney might be taken as a standard of measurement. Hold the pencil upright, the top on a line with the chimney top. Now move the thumb downwards until the end of your thumb comes between your eye and the bottom of the chimney. Then draw the chimney. Repeat this measuring operation, finding where the length of the chimney corresponds to other parts of the house. Your pencil can be moved between the house and your eye and by using the chimney length as your standard of measurement, the corresponding length and width of the house can be estimated.

With the pencil and thumb measuring technique, you can even find the angle of an object, such as the house’s roof. Just hold your pencil parallel with the object (in this case the roof). Then, without changing the position or angle of your pencil, just bring it down to your paper and make a light stroke indicating the angle.
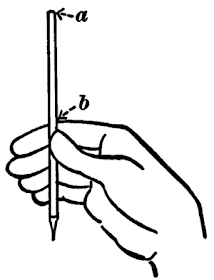


Likewise, by sliding the pencil up or down so as to increase or decrease its length between the points ‘a’ and ‘b’, (shown above) you will be able to check the height of an object as shown below. The same principle applies for heights and lengths/widths.
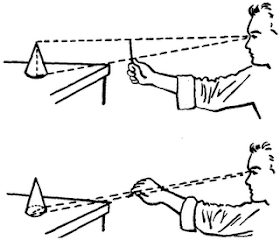


Above is a demonstration of the height of a cone being checked, while the bottom demonstrates the width of the cone being checked.

This thumb-and-pencil method of checking is easy to understand once you experiment with it. Be sure, however, that you do not change your position or distance from the model once you have started to check, since distance and position change the appearance and size of any object under study."

Local Color X Monet

Advanced Painting X Drawing:


Take a look at how local color changes as time and seasons pass in the following Claude Monet paintings of Haystacks and Rouen. Also note the use of value and color temperature to create depth.


Monday, October 24, 2011

The Sketchbook Project

An Advanced student offered up some info on a cool project that anyone can participate in. Check it out... THE SKETCHBOOK PROJECT


This past weekends first ever Zombie filled 5k was fantastic! Run For Your Lives has a link to go to the website and find next years location or more info on the Boston race if you're willing to make the trek! Here is your lean mean zombie out running machine teacher showing them how to do it... just like the gingerbread man.

Thursday, October 20, 2011

Advanced Class Hw inspiration


Local painter Jon Redmond's work touches on light and interior spaces. These are great pieces to look at while considering your paintings at home.

Www.jonredmond.com

You may also find this page helpful; specifically for the information on underpainting and looking at value as shapes.


Click Here

- Posted using BlogPress from my iPad

Tuesday, October 18, 2011

FYI


Thought this might interest some of you...

CLICK HERE FOR MORE INFO

Thursday, October 13, 2011

10th Grade Sketchbook Homework


Complete the following in your sketchbook:

1. A group of three pieces of fruit and two vegetables of varying shapes, sizes and kinds.

2. An arrangement of three kinds of hats.

*NOTE:
- All objects must have obvious highlight and shadow. Please include cast shadows when they are present.
-All images must fill page.
- When showing more than one object in a composition, the objects must overlap.
- Click HERE for a quick how to guide for working with value/shading.

DUE FRIDAY OCTOBER 21ST

9th Grade Sketchbook Homework


Complete the following in your sketchbook:

1. An arrangement of a clear glass and two pieces of fruit

2. A book bag and sneakers

*NOTE:
- All objects must have obvious highlight and shadow. Please include cast shadows when they are present.
-All images must fill page.
- When showing more than one object in a composition, the objects must overlap.
- Click HERE for a quick how to work with value/shading.

DUE FRIDAY OCTOBER 21ST

Advanced Homework

Complete an oil painting based on the composition and concept you designed for your daily ritual drawing. If you are not satisfied with your image redo it until you find a composition that you are genuinely excited to paint. If you did not complete 5 thumbnails for your initial drawing please do so now.

Consider your view, are you above, below or at eye level with the majority of the forms and objects in your environment; how would drastically changing this view heighten the drama in the image? Make sure that your image gives us context to understand the objects, it should not be a small arrangement of objects, we need to understand where they are and how they are used.

12x12 canvas' are available in class for a discounted rate, you may choose to work on another size but it should be completed on canvas. Your palette is limited... you may choose one pure primary color (red, yellow or blue) as your base. You will then use one neutral (yellow ochre or burnt umber/sienna), white and finally black.

One quick note about the use of black and white; you should not have any pure black present in your painting, nor should you have any pure white, make sure you are mixing your colors! Since only one of the three primaries is a pure version, you will be forced into a painting with a good color harmony. This will force you into harmonies and mixtures you might not otherwise try. Try to avoid using pure color until the end of the painting, and when you do use pure color do so sparingly to provide your viewer with "eye candy" or small shimmering focal points in your piece. DUE TUESDAY NOVEMBER 1ST, PLAN ACCORDINGLY


Remember the basics of developing value with color.


Notice the range of values and the lack of any pure black or white. (Image by Scott Burdick)


The artist is using shape and changes in value to describe the form rather than outlines, this helps create a softer edge and a more naturalistic image (Image by Scott Burdick)


Consider using more saturated or pure color for dramatic lighting effects. The artist used predominately low key values and used high key values for the highlights. Please note this image is not using a limited palette, please do not use any colors outside of your limited palette to achieve this effect... stay within your chosen palette. (Image by Scott Burdick)

Have fun!

Wednesday, October 5, 2011

PAFA After School Information


Monday 3:30-5
Intro to Illustration
Tuesday 3:30-5
OIl Painting
Wednesday 3:30-5
Life Drawing
Thursday 3:30-5
Foundation Drawing

CONTACT INFO FOR PAFA

Address:
118-128 N. Broad St.
Philadelphia, PA 19102